The necessary equipment is loaned free of charge by ESERO (contact ESERO for this: contact@esero.lu or +352 621 96 90 19).
Discover Life on Mars with a Rover
4#Discover Life on Mars with a Rover

4.3 Teaching materials
M1
M1 Instructions for teachers
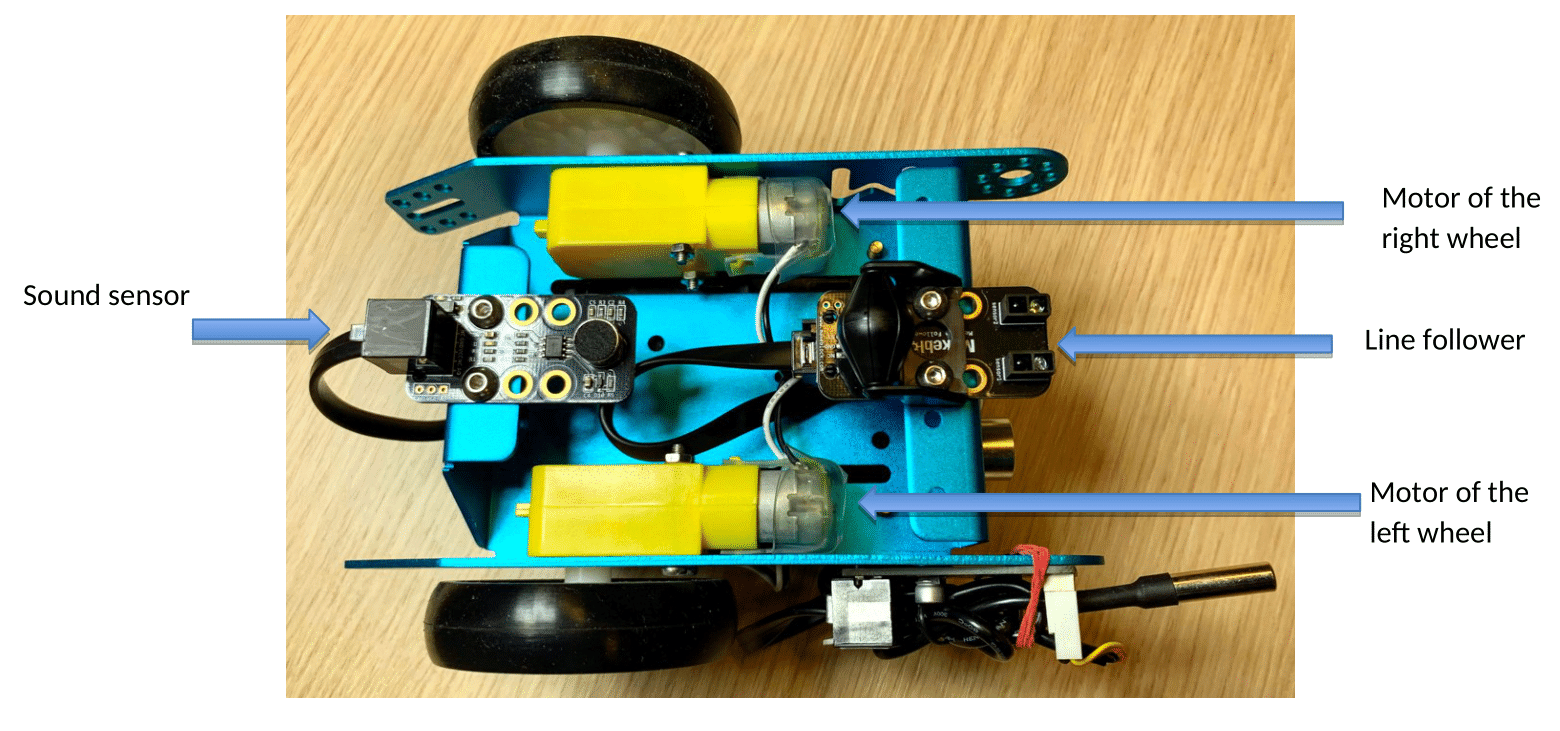
Introduction to the mBot rover
The mBot is a robot for beginners created by the company MakeBlock, which makes teaching and learning how to code a robot simple and fun. With the step-by-step instructions, pupils can familiarise themselves with the basic principles of block programming, develop their logic reasoning and their design skills.
Like any robot, the mBot interacts with its environment based on the instructions it is asked to carry out.
It is therefore capable of collecting information using its sensors and to carry out actions using its actuators.
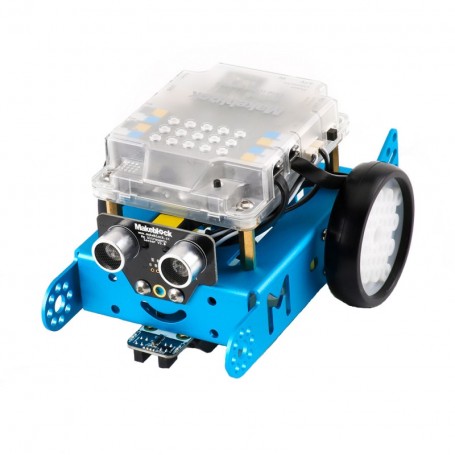
Actions
The robot is able to move using its two independent motors, each of which controls one drive-wheel.
- It can make sounds with a buzzer.
- It can emit light with its LED lamps on which the colour can be adjusted.
- To interact with its environment and to gather information, on the robot there is:
-
- an ON/OFF button,
- a launch-programme button,
- a “line-tracking” module for following a line on the ground,
- an ultrasound module that enables it to “see” obstacles in-front of it and know its distance from them,
- a light sensor which provides it with information on the amount of ambient light,
- a sound sensor which provides it with information on the level of ambient noise,
- a temperature sensor that measures the temperature in the ambient air,
- a line-tracking sensor.
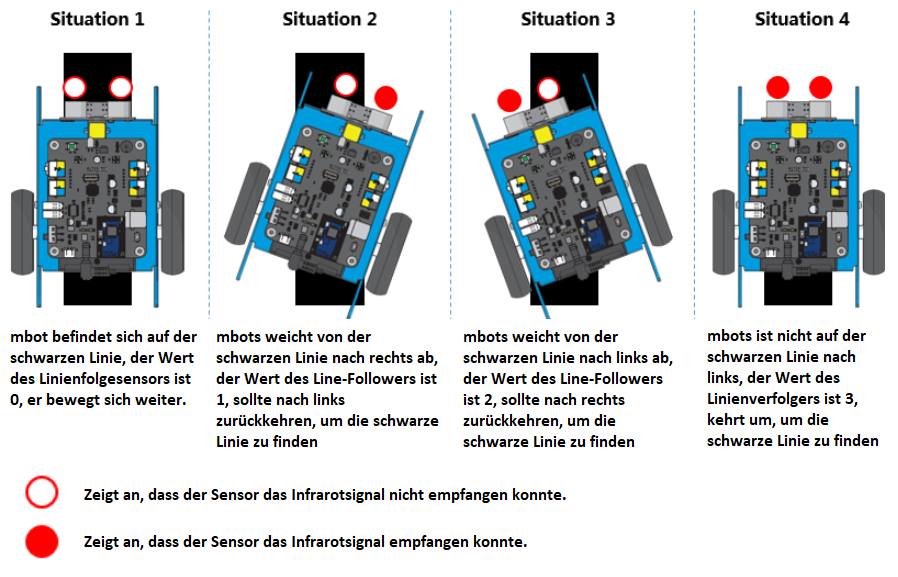
Fitted to the front of the mBot, the line tracker has two sensors capable of detecting a white surface (within a range of 1 to 2 cm), by emitting an infrared light and by recording the quantity of reflected light.
If a large amount of light is reflected, it can be deduced that it is near to a white surface. If the reflection is weak, it can be deduced that the surface is black or that the sensor is not near to a surface.
To identify the buttons and sensors:


The mBot robot is programmed using mBlock software. This software can be downloaded on PCs (Windows or Mac) or as an app version (for Android or iOS). It is also possible to use the web version of the software. This is particularly useful for the homework that pupils have to do before the lesson.
| How to use the programming software | |
|
1. Open the mBlock programme. |
 |
| 2. In the top left of the screen, choose your language by clicking on |  |
|
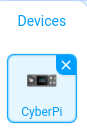
3. In the “Devices” tab on the left, delete the CyberPi device by clicking on the cross. |
 |
|
4. Still in the “Devices” tab, click on “Add”. |
 |
| 5. Select the mBot and click on “OK”. | 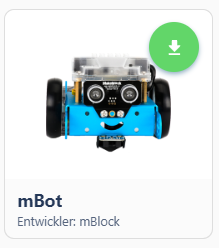 |
| 6. At the bottom of the screen, click on “Extension”. |  |
| 7. Add the extension “Sensing Gizmos”. |  |
Description of the user interface
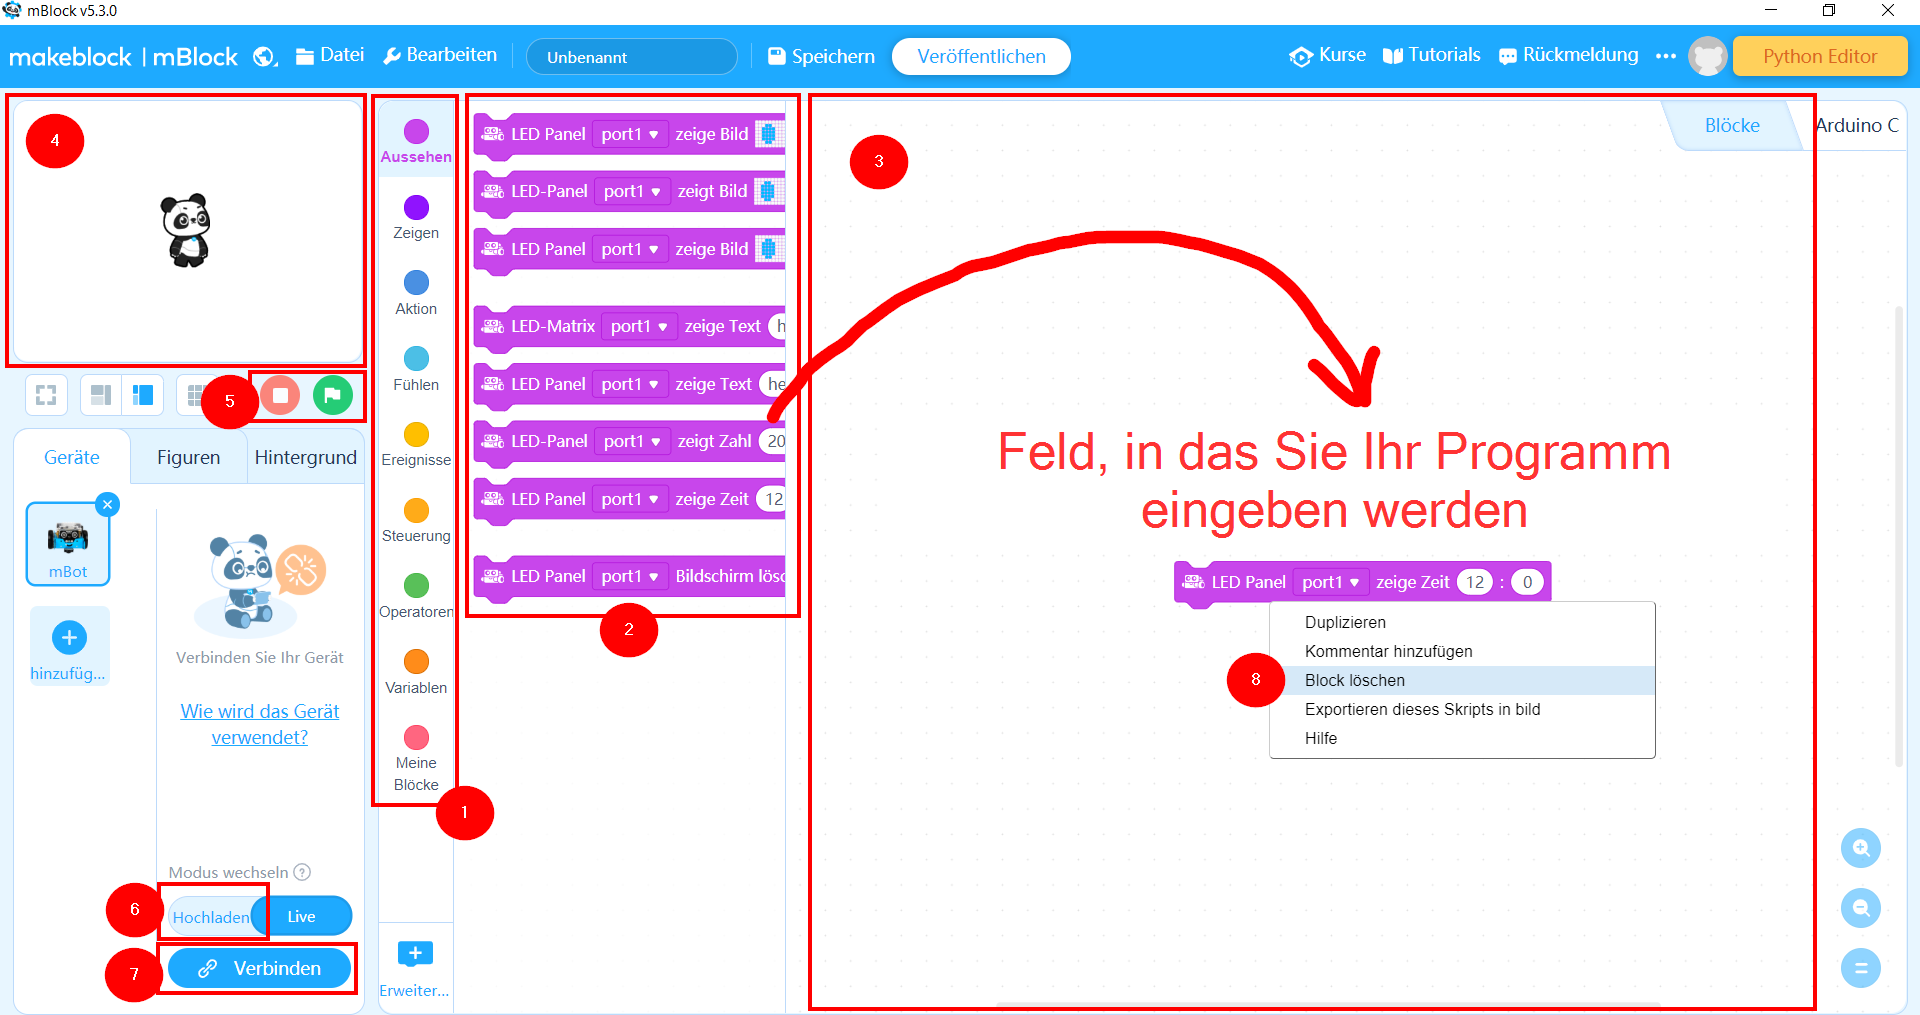
Zum Vergrößern auf das Bild klicken
To create the programme, all you have to do is drag the elements from the library into the programme-creation zone.
Please note, you sometimes have to place them in there carefully to make it interlock.
| (1) Zone for selecting an instructions library | (5) Start/stop the programme when you’re programming an image |
| (2) Zone for choosing an instruction to drag and drop into the zone | (6) Button to select to download your programme to the mBot |
| (3) Zone where you enter your programme | (7) Button to click to connect to the mBot |
| (4) Test zone for programming an image instead of the mBot | (8) To delete an instruction, right click – > delete the block |
Procedure for sending the programme to the mBot
- Place the robot on a surface, plug it into the computer.
- Check that the robot’s switch is on “ON”
- Make sure the “Upload” button is selected.
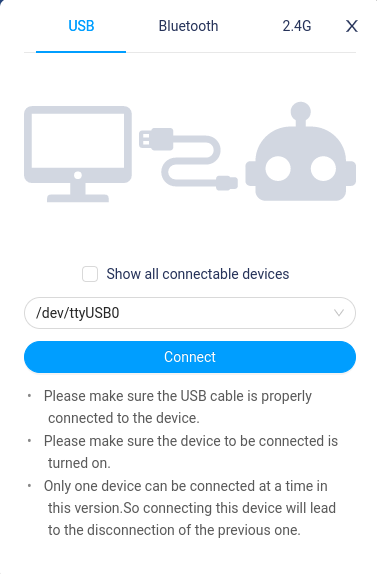
- Click on the “Connect” button.

- In the next screen, click on “Connect”.
- When the connection is established, click on the “Download” button.

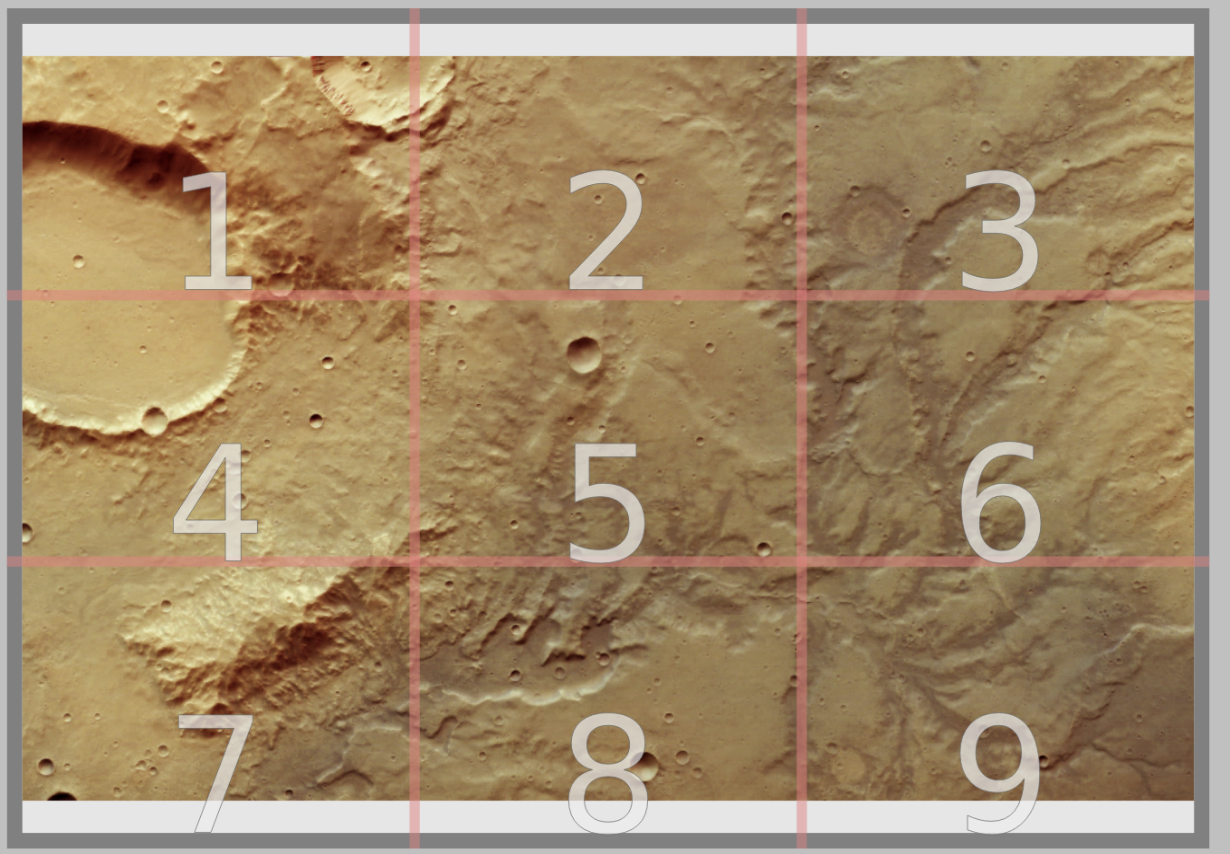
Presentation of the map of Mars
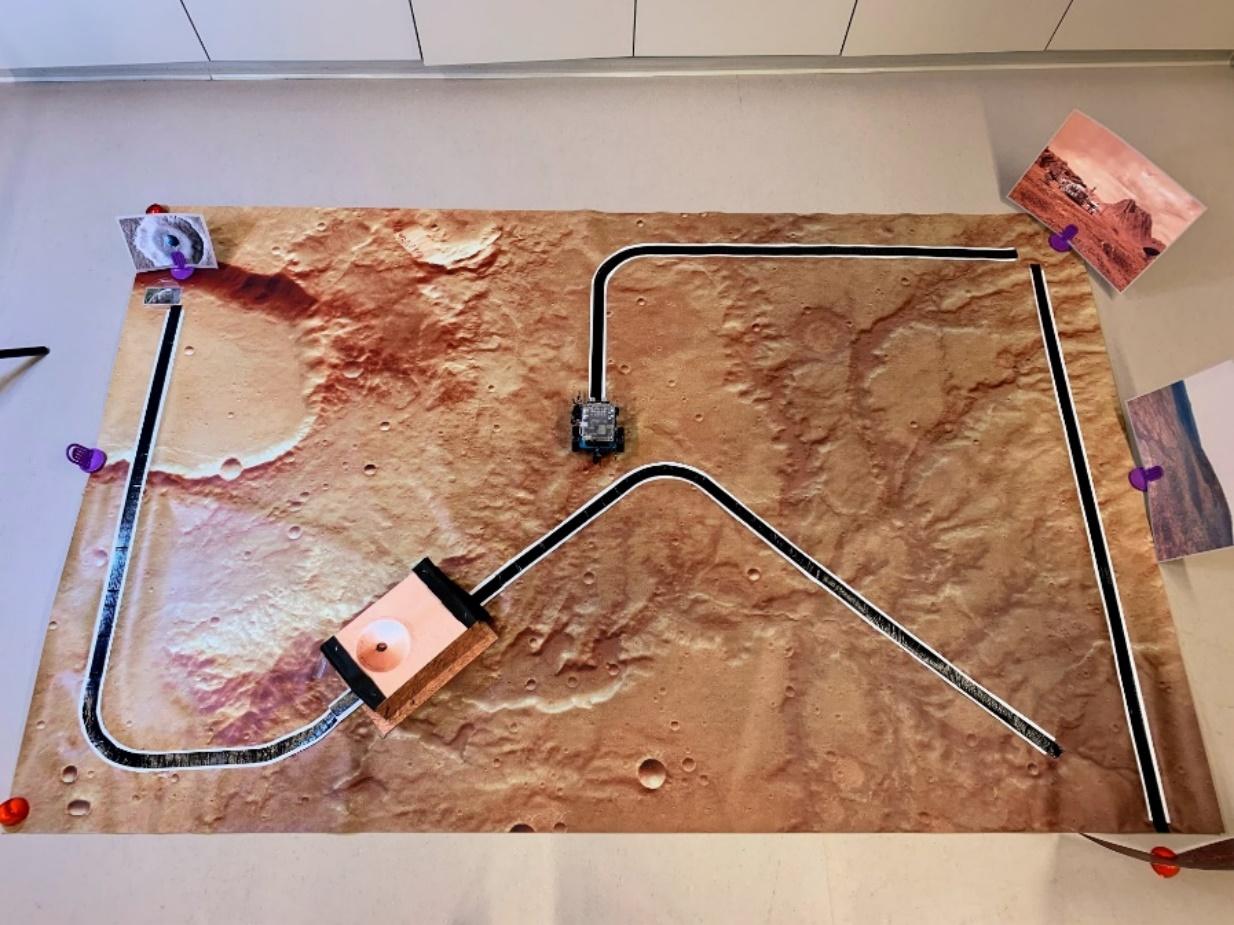
The map is a real satellite image that was taken by the ESA’s Mars Express satellite in November 2018.
It is divided into 9 zones which will be mentioned during the description of each mission.
Positioning
- Place the photo of the Martian base in the corner of zone 3.
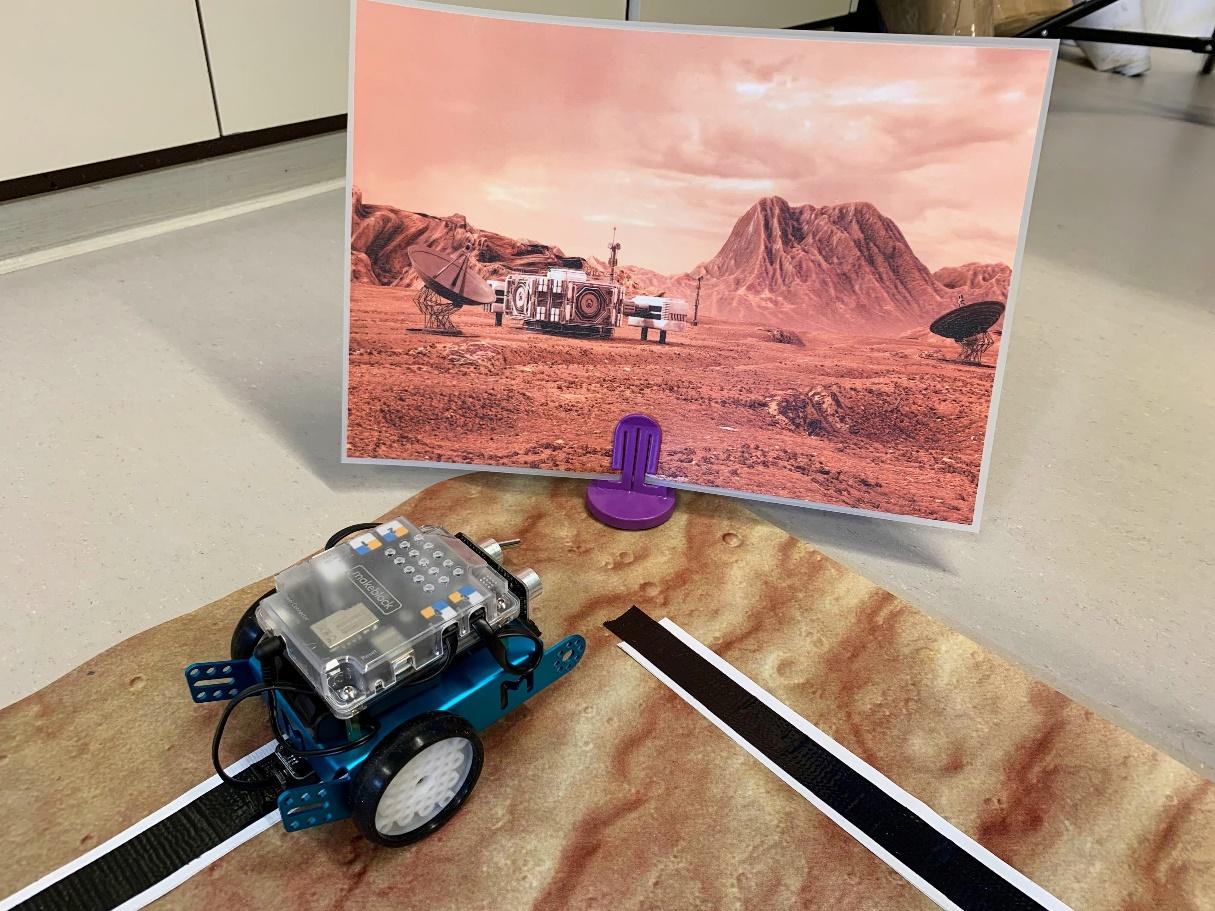
- Place the photo of the Mars landscape just outside the map, next to zone 6.

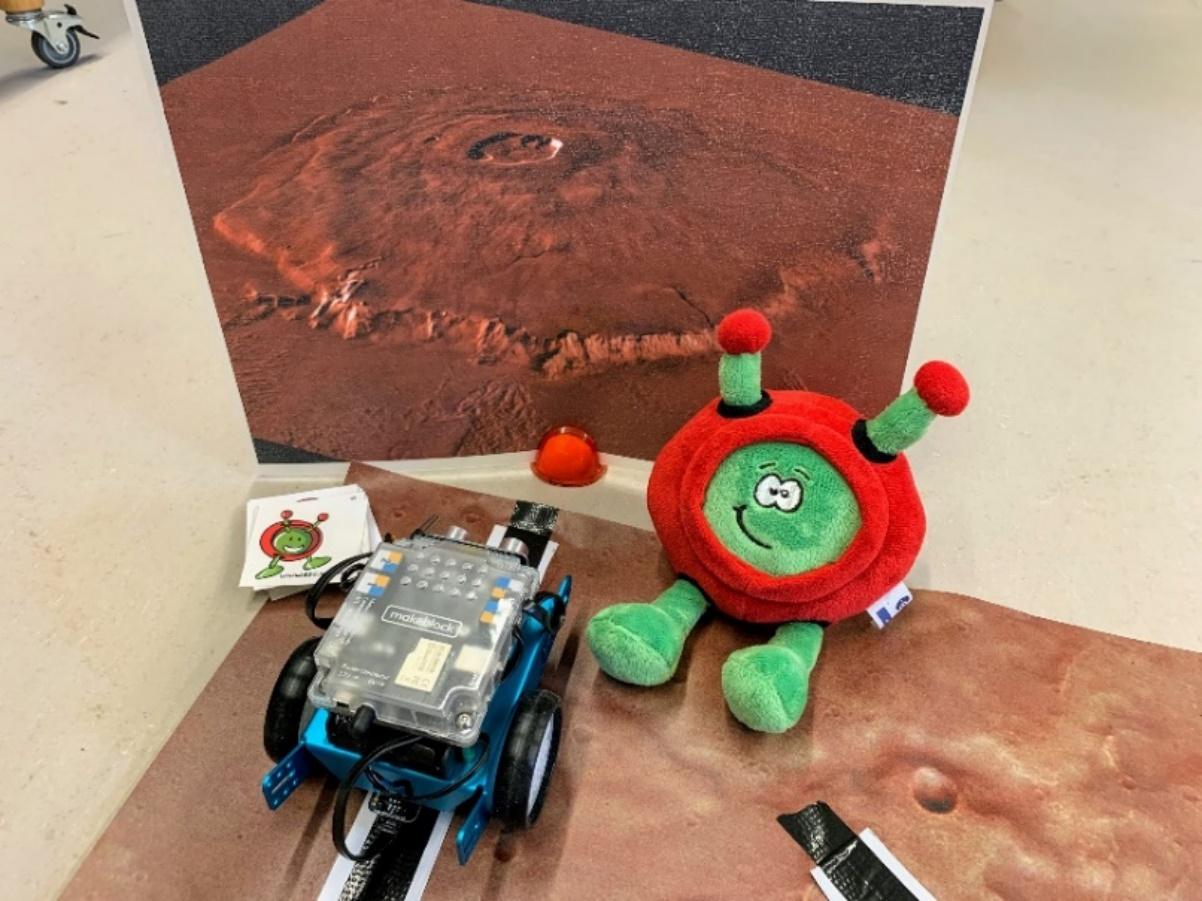
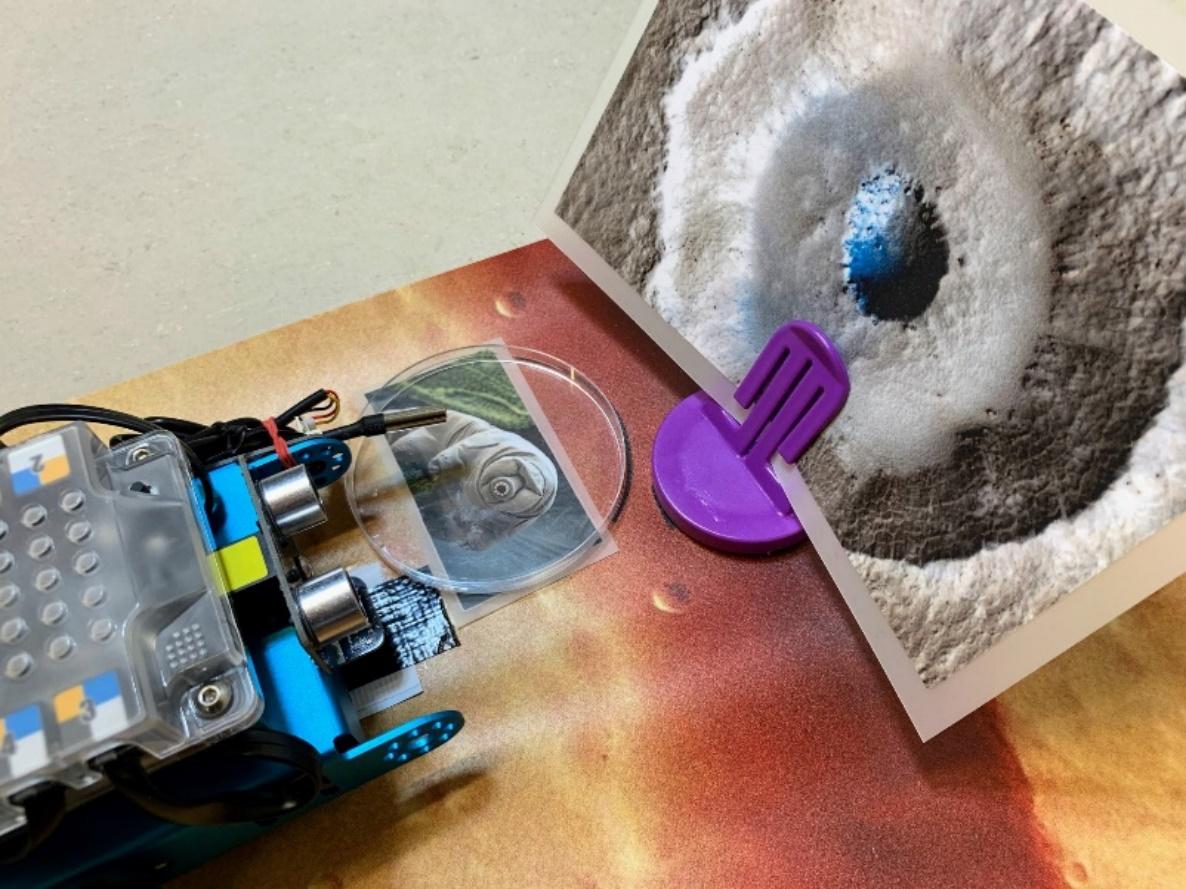
- Place the image of Olympus Mons vertically at the end of the road, below zone 9 on the map. Place Paxi (the ESERO mascot) and the Paxi stickers next to Olympus Mons.
- Place the Mars cave on zone 8, stick it to the map with sticky tape, put a piece of black road going across the cave and stick this to map as well.
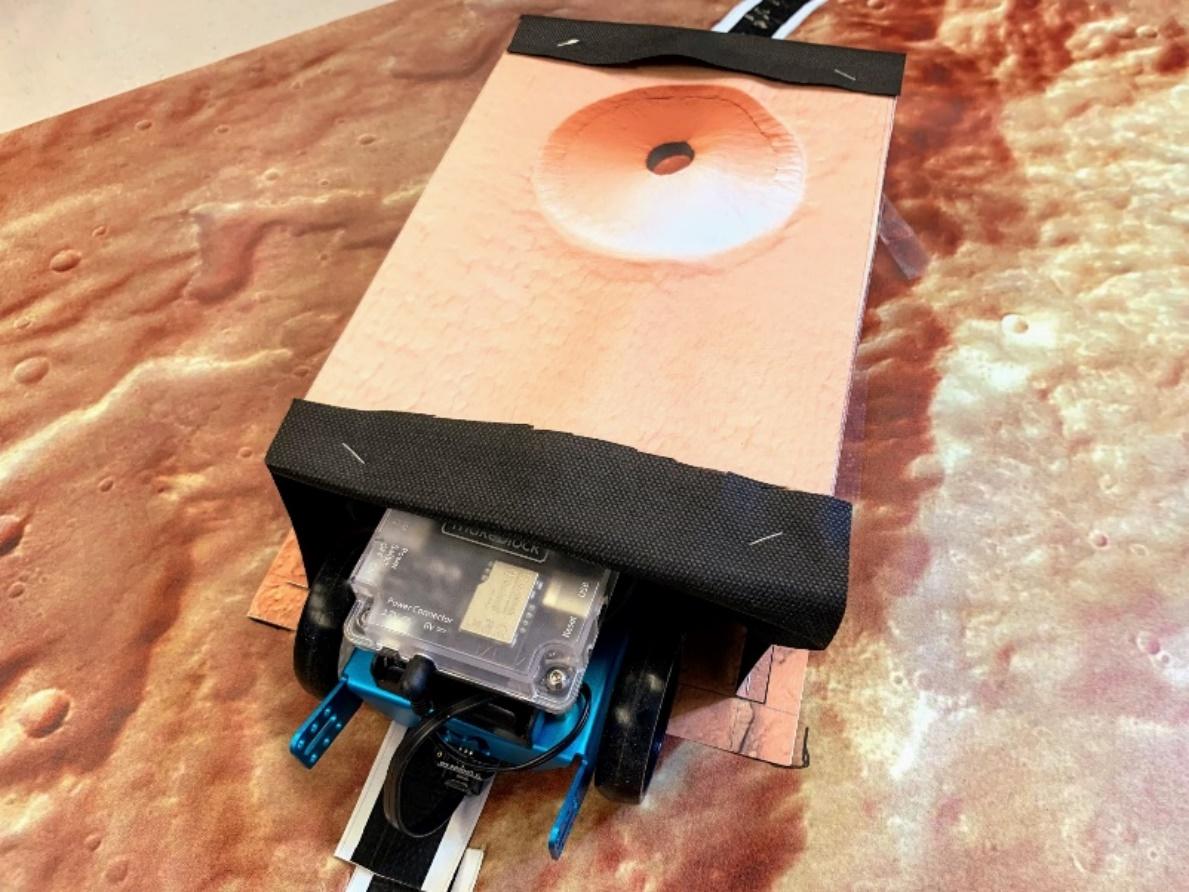
- On zone 1, place the image of the Mars impact crater vertically at the end of the road. Place a heat source to the left of the road, just in front of the Mars impact crater. Place the image of the tardigrade under the heat source and place the tardigrade soft toy next to the heat source.
Lesson preparation
- To ensure you are comfortable using the equipment, we strongly advise you read, understand and test the solutions to the 4 missions before starting the lesson with the pupils.
- Ensure a lithium battery or AA batteries are loaded into the mBot.
- Connect the rover to your PC using a USB cable.
- Press the ON button.
Reading your first programme
To familiarise themselves with the mBlock programme, pupils should do an initial exercise at home to prepare for the lesson. This exercise can be done on the web version of the mBlock programme. That way, they don’t have to install anything. Ask the pupils to carry out the following operations:
- In the Tutorials menu go to -> Example Programs.
- Select the scene -> Happy Panda.
- Click on “OK”.
Check that the pupils have understood:
- how the Panda is controlled by the coloured blocks. The coloured blocks represent the instructions to follow. There is no need for you to explain all the blocks in detail. Pupils should find out for themselves what they can do with each block.
- the function of the green flag and the red square.
Next, ask the pupils to change the Chinese message in the “say” block and to demonstrate what changes when the programme runs. Encourage them to play with the programme and to find out about the functions by themselves.
And they’re off!
The lesson can begin. The programming game is divided into 4 missions, preceded by “pilot training” – a test challenge to complete by programming the mBot to make it carry out specific tasks.
Since this module will constitute most pupils’ first experience with block programming, the pupils don’t have to program each exercise from scratch. Files containing part of the solution are given at the end of each mission. Pupils therefore only have to complete them to reach the final solution. To do this, pupils must save the files on their computer, then open them, still on their computer, through the mBlock interface.
For classes of pupils who have already worked on Scratch or another block-programming language, you could choose not to use these files and let the pupils program the entire mission.
The missions have been designed to be of increasing difficulty: first, pupils are asked to focus on variable values (mission 1), then on programme logic (mission 2), and then to combine the 2 aspects (missions 3 and 4).
Write your first programme: pilot training
For this first exercise, the mission consists of:
- making the mBot drive in a straight line across the table.
- stopping the mBot as soon as it is less than 10 cm from an obstacle by using the ultrasound sensor. The obstacle could be the pupil’s hand, a book or any other object.
Mission 1
Context:
The rover is in the centre of the map, in a dry valley, and receives the order to return to its original base to receive a new mission.
Mission:
Pupils must return to the zone 3 base, by following the black line with the line-tracking sensor.
In the “Sensing” instructions library, there are 2 blocks associated with the line tracker:

This first block will send back a number between 0 and 3 based on the following values:


The second block then sends back either true or false.
Programming:
Pupils must download the exercise to be completed.
Important note: In general, for line tracking, pupils intuitively tend to program using time commands for turning left or right, which makes it very difficult to stay on the line. The notion of time depends on the motor’s power at that point in time. Furthermore, we have noticed that pupils (and adults alike) underestimate the length of a second.
Instead of programming this,
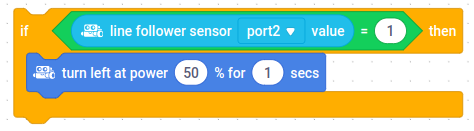
it is much more reliable to use the line-tracker’s reaction time and to reduce the motors’ power.
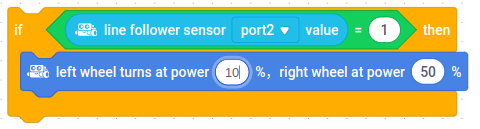
Unfortunately for the “reverse” command, seconds have to be used. Here, make sure pupils do not choose a duration that is too long (not more than 1 second).
IT Mission Control: so that the pupils can learn from their errors – resulting from incorrect judgements and programming – it is necessary to document these trial-and-error learning processes. Pupils are therefore tasked with commenting on mBlock on the coding and reasons why they coded in one way or another. To comment on a line of code, you must right-click on the line of code and click on “Add Comment” (see the description of the programming interface above.)
Mission 2
Context:
The rover has returned to its base and receives the order to try to find life on Mars.
The ExoMars satellite has found some potentially interesting places and has given some GPS points to visit.
The base has also received an urgent message from Paxi, who has encountered some technical problems with the spacecraft not far from Olympus Mons, the highest mountain on Mars.
The pupils must first rescue Paxi who will be a great help for our mission since Paxi has great knowledge of the Mars landscape.
Mission:
Pupils must:
- follow the black line from zone 3 to zone 9.
- stop in front of Olympus Mons using the ultrasound sensor.
- produce a light signal using the mBot’s LED lamps to inform Paxi of their arrival
- get Paxi to “come aboard” by giving the pupil a Paxi sticker
Programming:
The pupils must download the exercise to carry out.
IT Mission Control: pupils are tasked with commenting on their lines of code on mBlock.
Mission 3
Context:
The ExoMars satellite has shown the location of a Martian cave to explore, which could contain life. Pupils must enter the cave and scan it.
Mission:
The pupils must:
- follow the black line from zone 9 to zone 8.
- stop inside the cave when the light sensor detects a low light intensity.
- produce a sound signal simulating a laser scanning the inside of the cave.
Programming:
The pupils must download the exercise to complete.
IT Mission Control: pupils are tasked with commenting on their lines of code on mBlock.
Mission 4
Context:
The pupils have not found life inside the Mars cave, but there is another promising location.
Suddenly, we hear the sound of a meteorite crashing not far from the entrance to the cave. The pupils must go to the crash site to look for traces of life.
Mission:
The sound of the meteorite crashing is simulated by clapping.
Using the sound sensor, the mBot must:
- hear the sound of the meteorite’s crash using its sound sensor.
- stop in front of the meteorite impact crater.
- measure the temperature to detect a source of hot water of above 30 °C that contains life.
- play a “victory song”, composed on the mBot, if the temperature is over 30 °C!
Programming:
The pupils must download the exercise to complete:
Important notes:
Prepare the heat source just before starting this mission.
IT Mission Control: pupils are tasked with commenting on their lines of code on mBlock.
M2
Instructions for pupils (homework)
Read your first programme (to do at home)
- Go into the Tutorials menu on Example Programs.
- Select the Happy Panda scene.
- Press “OK”.
Do the following tasks:
- The blocks of colour give the panda instructions. Try to find out what you can do with each block.
- Work out what action the panda is made to do by which coloured block in the programme and write it on a list. Take this list to your next lesson.
- Try to understand the function of the green flag and the red square.
- Change the Chinese message in the “say” block and write down what this changes when you run the programme.
M3
Instructions for pupils: the missions
Write your first programme: pilot training
Here is your first exercise:
- Make the mBot drive straight ahead on the table in front of you.
- Stop the mBot as soon as it is 10 cm away from an obstacle, using the ultrasound sensor. The obstacle could be your hand, for example.
Missions
IT mission control: You are in charge of IT Mission Control. If the rover does not carry out the order requested and causes an accident for example, the mission is a failure. It is therefore important to analyse the errors to improve the code. This is why IT Mission Control makes comments on the codes on mBlock [right-click on the mouse -> comment].
Mission 1
Context:
The rover is in the centre of the map, in a dry valley, and receives the order to return to its original base to receive a new mission.
Mission:
Return to the base in zone 3 by following the black line, using the line-tracking sensor.
Help:
In the “Sensing” instructions library, there are 2 blocks associated with line tracking:
This first block will send back a number between 0 and 3 based on the following values:
The second block will send back either “true” or “false”.
Programming:
→ Download the exercise to be completed: Return to base
Mission 2
Context:
The rover has returned to its base and receives the order to try to discover life on Mars!
The ExoMars satellite has found some potentially interesting places and has given some GPS points to visit.
The base has also received an urgent message from Paxi, who has encountered some technical problems with the spacecraft not far from Olympus Mons, the highest mountain on Mars.
The pupils must first rescue Paxi who will be a great help for our mission since Paxi has great knowledge of the Mars landscape.
Mission:
- Follow the black line from zone 3 to zone 9.
- Stop in front of Olympus Mons using the ultrasound sensor.
- Produce a light signal using the mBot’s LED lights to notify Paxi (the ESERO mascot) of your arrival.
- Get Paxi to “climb aboard” by taking a Paxi sticker.
Programming:
Download the exercise to be completed: Rescue Paxi on Olympus Mons
Mission 3
Context:
The ExoMars satellite has indicated the location of a Martian cave to explore, which could contain life. You must enter the cave and scan it.
Mission:
- Follow the black line from zone 9 to zone 8.
- Stop inside the cave when the light sensor detects low light intensity.
- Produce a sound signal simulating a laser scanning the interior of the cave.
Programming:
Download the exercise to be completed: Explore a Martian cave
Mission 4
Context:
You haven’t found life inside the Mars cave, but there is still another promising location.
Suddenly, we hear the noise of a meteorite crashing not far from the cave. You must go to the crash site to look for signs of life.
Mission:
- Simulate the meteorite crash by clapping your hands.
- Hear the sound of the meteorite crash (simulated by clapping) using the mBot’s sound sensor.
- Measure whether the temperature inside the cave is positive to test the temperature sensor.
- Stop in front of the meteorite’s impact site.
- Measure the temperature to detect a heat source of above 30 °C, containing life.
- If the temperature is above 30 °C, play a “victory song” that you have composed on mBot!
Programming:
Download the exercise to be completed: Find life on Mars
